Tag: craft pattern

doll overalls : a free sewing pattern

doll overalls free sewing pattern

doll overalls free sewing pattern

Of course the tiny rag doll need overalls. And they come in mr. socks size too cause I’m nice like that. They’re easy and quick to make and you could scale the pattern up for larger dolls. Sew them completely by hand or some seams can be done on machine if you like.

doll overalls free sewing pattern

You will need :

the template – get the doll overalls template here and the mr. socks overalls template here.

light weight cotton fabric

a basic sewing kit

and optional – tiny buttons and little scraps for patches

doll overalls free sewing pattern

1. Pin the strap fabric to single piece of fabric. Pin the overalls pattern to a doubled piece with the right sides together.  Pin the lining to a single piece of fabric – you can use a contrasting fabric or the same as the overalls.

Note – I’m using a print from the French General new lawn cottons. The prints are all super sweet and great for small dolls.

2. Mark the seam line lightly in pencil on the wrong side of the lining piece and both overall pieces.  It’s also helpful to mark the front and back on the overall pieces as indicated on the pattern.

3. With the right sides of the fabric together sew just the front seam of the overalls  as shown in red above – stopping at the end of the curve.

4. Clip a couple little notches in the seam allowance at the curve. Be careful not to clip the seam.

5. Press the straight part of the seam open.

6. Press the top seam allowance over – wrong sides together – on the lining and overalls.

7. Place the lining on the overalls with the right sides together and pin. Stitch only the curved seams as shown above.  Clip little notches into the seam allowance.

Read More

how to make salt clay

making dolls and mini dishes from salt clay

salt clay diy

It’s also called Victorian Salt Clay, I even love the sound of it. The question was “ What if you want to make tiny dishes but don’t have paper clay?” I wondered if a homemade, air-dry clay could work and the answer is yes. It was a fun experiment plus I love the way it smells – I was immediately 11 again.

Salt is the main ingredient. It produces a clay that is a little more textured than paper clay. It takes a while to dry – a day or two. You shouldn’t bake it but you can put it someplace warm to speed up the process. My oven has a pilot so it’s always a little warm and I put my pieces in it overnight. The small things were dry but the larger pieces needed another day. It’s very hard when dry and can be sanded and painted – I have tips for that below. First let’s make the clay.

You will need:

1 cup of salt
⅓ cup water
½ cup cornstarch
¼ cup cold water

!. Mix 1 cup of table salt with ⅓ cup of water. Heat in a small pan over medium heat, stirring constantly for 4 minutes. Do not let it boil. Remove from heat.

2. Quickly stir the ½ cup cornstarch into ¼ cup cold water. It’s very important that you sprinkle the cornstarch a little at a time stirring constantly or it won’t mix properly.

3. Put the salt mixture back on low heat and add the cornstarch mixture stirring constantly. The mixture will begin to thicken. Keep stirring until it becomes dough like – this happens pretty quickly.

4. Scoop it out onto a plate and let it cool. When it’s cool enough to handle, knead it into a smooth ball. It’s ready to use – you can roll it like cookie dough or sculpt it. Left over clay can be stored in the fridge in an airtight container. I did find it a little crumbly when I took it out of the fridge the next day but after I kneaded it again it was sculpt-able.

making dolls and mini dishes from salt clay

salt clay miniature teacup

I tried making some plates and cups from the tiny dish tutorial and got good results. When I formed it over things it was looser than the paper clay but it still worked. And in the plate tutorial I recommend letting it dry about halfway before cutting the shapes. With the salt clay you can’t do that – it becomes too brittle. It’s a pretty stiff clay though so easy to cut.

dollhouse dish tutorial


Over-all I was pleased with the results – not as fine as the paper clay but still charming and I definitely value heart over perfection in tiny dish making.

Plus it’s fun to make the clay!


I sanded the pieces and painted with watercolor, acrylic craft paint and finished some with nail-polish. Use quick multiple coats of paint. I found if I overworked the paint it would lift.

miniature cast iron pan

The handle on the tiny cast iron frying pan broke when I sanded it but I glued it back on and painted it with black nail polish. The teacup got painted with black nail polish too. The soup kettle was made by forming the clay over a handle – similar to the process for creating the teacup in the dish tutorial.

salt clay diy - pots and pans

salt clay diy

mini doll parts made form salt clay

Parts for a little doll experiment showed up too. Such a funny little lady, I love her. I’ll post a photo when she’s finished.

magic stones made form victorian salt clay

And magic stones.

I made them, that’s how I know for sure they’re magic. They are painted with watercolor and acrylic and finished with a layer of nail polish. The clay and stones would be a fun project to do with little folks and a magic rock in your pocket can’t hurt.

I hope you make victorian salt clay!

the somewhat weekly newsletter

Do you get my free weekly-ish newsletter? There are tips and tricks, ideas, stuff to try, all the latest news and blogposts and extra stuff, just for subscribers, delivered mostly on Friday. Pretty much.


paintings to stitch, the hexie quilt and nude rag doll news

painting sampler - teacup

stitch painting embroidery

Every day starts with stitching owls and castles and swans etc. and making scrap hexies. I chose a few images from the daily paintings to print on linen and stitch and I love stitching them, I find it hypnotic. It’s a free style situation – choosing lines or details to highlight and embellish. I’ve only been using 3 stitches – back stitch, satin and french knots.

a cozy sewing situation

You can find the stitch paintings in the shop.

When I finish these I’ll keep them in the hoops and hang them in a little group –  I’ll show you how to do that soon. I’m using DMC floss – the six strand stuff – separating one, two or three strands. 

painting sampler - teacup

embroider a blue bug

I love this blue bug gentleman, where is he going? Who are those flowers for? And I love the little french knot flowers for his bouquet.  I used two strands of thread for these. 

french knots:

Bring the needle through the fabric where you would like the knot.  Hold the thread tight about and inch from the fabric with your other hand. Place your needle in front of the tight floss – be sure it’s in front – not behind. 

Wind the floss around the needle twice (or once for a tiny knot),  Don’t twirl the needle to wind the floss – wind it around the needle with your non-needle hand,

Keep the tension of the floss and put the needle back in right next to (not in the same hole – but very close to it) where you began. Keep the thread tight with your non-needle hand and pull the coil downward towards your fabric. Pull the needle through to finish the knot.

hexie update:

I add a few every day- I’m moving from the multicolor scrap area into a pale section and starting a  dark blue group too, Lots of people are making hexies! Check out #hexiesforsanity to see. And I found a printable sheet of templates here.

 making a hexie quilt from scraps

embroidering a doll face

Scandalous doll pattern update: Just about there and it is awesome. The hard part for me was the head – I changed my mind over and over but finally settled on a solution I’m super happy with.  Stay tuned.  And get some fabric – muslin or any light cotton.

What are you working on?  Come across any cool projects, recipes, awesome books  or ideas you’d like to share? Please leave them in the comments.

house for a mouse : make mini chandeliers and a bed

mouse house diy projects

doll house diy

Making a cozy house for nice mice: part 2 – the bedroom

If you haven’t checked out Part 1 find it right here.


doll house furniture tutorials

mouse house tutorials

mouse house diy

The Admiral escorts Mrs. Croft off to bed.


doll or fairy bed diy


Of course they need a bedroom too, a cozy escape from the trials of the day.  The tutorial for their dear little wire bed is here.


dollhouse chandelier diy

*some links are affiliate links – meaning I get a tiny commission if you purchase through the links – they are marked with an asterisk

The fancy chandeliers are made from vintage beads and buttons and *24 gauge wire. Any wire small enough to fit through your beads will work. Improvise and work with what you’ve got – that is the spirit of the mouse house. I didn’t have a ton of beads – I gave most of them away a while ago – what was I thinking… So I took apart a couple vintage earrings, found a few glass buttons and beads and some tiny plastic seed beads.

I’ve got some tips below to get you started:

dollhouse chandelier diy

Make a circle of beads on your wire – whatever size you like. Twist 3 or four wires onto the ring – with a short end and a long end.

dollhouse chandelier diy

I used four wires – spaced out pretty evenly around the circle of beads.

dollhouse chandelier diy

Add a bead or button to the short ends and curl them up.

Read More

9 creative project ideas for big folks and little folks

terrarium

terrarium

1.

A terrarium  is an awesome project for big people or little people. There are a bunch of tutorials available in varying degrees of complexity – this one is specifically geared towards little people.   My advice would be to not get too locked in by details like the right kind of container or soil, or plants, adding charcoal etc. etc.. Improvise, work with what you’ve got and try stuff. Make a magical mini landscape.

2.

This wax paper specimen collecting journal is another great idea for backyard or park adventures. If you can’t get outside it could be for collecting words and ideas.

3.

Fabric scraps –  I love this sweet scrap bunting and  there are tons of fabric scrap ideas here and here and more here.

cardboard playhouse

4.

Cardboard castles  and playhouses – I sure do love cardboard. Use whatever you’ve got to build a ship or castle or playhouse.

5.

Fun kitchen projects for kids – the playhouse above is one of my most favorite projects of all time. I made it for Clare Crespo’s Yummy Fun Show.  So many cool kitchen projects to do with your little people. And super duper talented Clare has shared all the episodes right here.

paper mache teacups

6.

Paper mache teacups –  Have you got a cereal box and  paper? Make a sweet paper mache teacup.  And you can make your own wheat paste!

paper ship and boat installation

7.

Make an installation  – a cozy space for daydreams.  In the best of times I am obsessed with making things cozy. In the current deep uncertainty this impulse has gone into overdrive. Easy to make paper boats, simple and festive paper lanterns and scrap garland (plus twinkle lights if you’ve got them) could turn a corner into a magical space for daydreams.

8.

Homemade journals – there is a great tutorial for making a journal from brown bags here and another from junk mail envelopes here.  Besides the fun of making the journal it’s a great time to get into the habit of a small daily creative practice- maybe a journal page a day – collage, drawing, collecting – whatever you like. Showing up everyday for a small daily practice is as close to a magic formula as there is for growing creatively.

guick figure expeiments created with paper and fabric

9.

Play – You know what my most frequently asked question is lately- “ Where do you get your ideas? “ Such an interesting question.  Making a painting everyday has made a big difference in the quantity and quality of my ideas. And play is a huge part of it too. Messing around without being too concerned with the outcome. Try this 30 minute figure play session.

Check the free pattern page for even more ideas! And if you have a project or idea to share please leave it in the comments section.

onward!

ann

wire doll bed diy

wire doll bed

wire doll bed tutorial

Maybe you’d like to start a home for tiny foundlings. Or your mouse house needs a bed.
I’ve made you a diy just in case. When I started messing around with this I found the twisting and wrapping wire construction method pretty difficult so I experimented with other ways of fastening wire. I ended up with something that I think is way easier  to do (tape) and I’m super happy with the result. So happy I made a bunch, I am currently even extra obsessed with making things cozy.  And I like their wonky vibe, it’s a big part of their charm,  perfection should not be a goal in this project.

I’ve sized this bed for very nice mice but there are notes for enlarging it a little for the tiny rag doll or mr. socks. It’s a good idea to have socks or the tiny doll nearby while you make it to double check your fit.

wire doll bed tutorial

*This tutorial contains affiliate links – meaning I get a small commission if you purchase through the link – they are marked with an asterisk.

Notes on wire: I used 19 gauge galvanized wire in the demo – it’s pretty stiff. The easiest wire to use is this soft annealed *19 gauge black wire. If you have something else on hand give it a try. As long as it bends easily and holds it’s shape it should work.

Notes on tape: Masking tape and *floral tape both work. I made the demo with masking tape since it’s likely you have some of that. The floral tape makes a more invisible join but after making a whole bunch I prefer the masking tape functionally and aesthetically.

wire doll bed tutorial

Before we start putting the bed together let’s talk about finishing. Because I use  tape as the fastener I painted the whole bed. Both the galvanized wire and the softer black wire took the paint (acrylic craft paint) well. I recommend using darker colors or black.

And of course you’ll need a mattress and pillow. It’s super easy and you can sew by hand or machine.

download the mattress and pillow patterns

You’ll also need scraps of fabric a basic sewing kit and something to stuff with. Anything is fine – even toilet paper…

*If you opt to make a larger bed for the tiny rag doll add 2 and 1/2 inches to the length of the mattress template.

Cut out the mattress and pillow fabric and pin with the right sides of the fabric together.

Sew the seams leaving a small section open for turning.

Clip of the corners, turn the mattress and pillow right side out, stuff lightly and then stitch the openings closed.

The template includes a pillow case and you can find instructions for that right here.

make a wire doll bed

materials and tools:

needle nose pliers and wire cutters

19 gauge wire – this soft annealed is easy to work with

masking  tape or *floral tape – see the notes above

craft paint and brushes

wire doll house furniture tutorial

1. Cut all your wire pieces:

  • 2- 18 inch
  • 1- 10 inch
  • 2- 6 inch
  • 1- 10 and 1/2 inch
  • 1-  8 and 1/2 inch

If you would like to make a larger bed for miss thistle make the long pieces 20 and 1/2 inches instead of 18. Also cut an extra 10 inch piece.


2. Bend the 10 and 1/2 inch and  8 and 1/2 inch pieces into U shapes.

3. Bend each of the 6 inch pieces as shown – 1 and 1/2 inch from each end.

4. Bend the 10 inch piece into a rectangle with the ends overlapping (for the larger tiny rag doll bed make 2 of these).

5. All your ready to assemble parts should look like this.

Read More

make a house for a mouse

make a mouse dollhouse

mouse doll house

A fancy dress tea party for very nice mice!

They are so happy to see you! Come right in!

Step into their warm, welcoming ramshackle room. I could totally live there! They’ve made it extra festive and cozy for a fancy tea party with friends.

Find part 2 – a cozy bedroom right here.

mouse doll house tea party

The dear little scene is made from stuff I had around, a couple things from my childhood dollhouse, old french letters on the wall and some favorite tiny treasures. The mice and plates are free tutorials in case you are feeling the need for a mouse tea party. I’ve shared a few tips and ideas below for creating a very nice mouse house including miniature plate hangers for your tiny mismatched china, more on that in a minute.

make a mouse dollhouse

mouse tea party

Making a mouse tea party was not my plan for Saturday.  All of a sudden I felt the need to make something entirely for Joy. 100% JOY.  And it was, sorting through my treasures, making the wire chandelier, putting together the little scene and photographing it was 100 % joy.

mouse doll house door

mouse house diy

some details:

*some links are affiliate links – meaning I get a tiny commission if you purchase through the links – they are marked with an asterisk

A fancy bicorne hat for the host -The tiny bicorne hat was made using this pattern but I used the “bird bicorne accent” pattern piece for the hat and then cut another a little smaller for the decorative piece.

The mice – made from the very nice mice  free pattern – pro tip – lately I’ve been adding walnut shells or a coin or two for weight in the bottom to help them stand up.

Tiny plates and cups made from this free tutorial – so much fun.

pickling spice for mini mouse food

mouse food – Pickling spice makes great mouse food. I put some in a little glass button and sprinkled some by the door mat too – little mouse debris, you know how mice are…

miniature chandelier

Chandelier – Its made from this *super handy 24 gauge wire, a vintage earring I’ve had for ever and a few tiny beads. The easy plate hangers are made from this wire too.

make miniature plate hangers

make miniature plates and plate hangers for a dollhouse

Cut a few inches of  *24 gauge wire. You will also need needle nose pliers – small ones are great, wire cutters and pins for hanging. I used the sharpie to color the *little applique pins. The little pins come in handy for lots of dollhouse things.

Bend the wire in half and make a loop. Twist the ends under the loop,

Place your tiny plate on  and bend up the ends.

Remove the plate, trim the ends and curl them with the pliers.

Put your plate on and press the curled ends to hold the plate snuggly.

make miniature plates and plate hangers for a dollhouse

The wall is made from foam-core and I push the little pins (colored with a sharpie) in to hold the hangers. You can use tiny nails too.

If you’ve got kids home from school this would be a fun project and stay tuned for more ideas. If you do make a mouse tea party I’d love to see – you can email photos to info at ann wood handmade dot com or use #annwoodpattern and #mousehousediy to share on instagram.

Wishing you all health and  peace and happiness and I hope this all passes quickly.

Onward!
ann

the somewhat weekly newsletter

Do you get my free weekly-ish newsletter? There are tips and tricks, ideas, stuff to try, all the latest news and blogposts and extra stuff, just for subscribers, delivered mostly on Friday. Pretty much.


pin girls : sweet pin cushions made from scraps – free pattern

pin cushion doll - free sewing pattern

pin cushion - pin girl- free pattern

*This post contains affiliate links – meaning I get a small commission if you purchase through the link.

Did you ever make something you liked so much you put it next to your bed so you would see it first thing in the morning?  This pin girl is like that for me. Something about it… And I’ve made a pattern for you. The pin girl is not only the official pincushion of the 2020 scrap festival but she is also the official pincushion of the miss thislte society.
Before we get started let’s talk about pincushion filling for a minute. I think walnut shells are ideal (unless you have a tree nut allergy). They add a nice weight and fill out the curvey shape beautifully. I got a huge bag here (I get a small commission if you purchase through this link).
Sand works too and you can most likely find fine sand at your hardware or gardening store. For this pincushion I don’t recommend using just fiber – the weight and shape won’t be nearly as nice. If you have other filling ideas please let us know in the comment section. Also – I’m thinking of putting together kits for the shop with sweet fabric, and everything else you need – what do you think?

Let’s make pin girls!

You will need:

download the pdf template

Affiliate links are marked with *

fabric scraps – cotton and a little wool or felt
A wooden bead- I used a ⅞ inch (about 22mm) bead – a little bigger or smaller is fine. You can get beads with faces! *right here.
wooden skewer – the larger size is best – what matters is that your bead fits on it. I *used these.
crushed walnut shells – I *used these
a little wool stuffing
trim and lace scraps
chopstick
funnel
glue stick
paint and brushes
white or wood glue
a basic sewing kit

1. Cut out one bottom and 3 doll pattern pieces. Mark a 1/4 inch seam line lightly in pencil on all your pieces.

2. Fold the top edge of the doll pieces over towards the wrong side at the seam line and press.

3. Pin two of the doll pieces – right sides together and stitch one side. Stitch over the folded edge and stop at the bottom seam line as shown. You can hand or machine stitch – in either case use a very small stitch.

4. Open the two pieces you just stitched together and match the edge of the third doll piece to one side.

free pincushion sewing pattern

5. Pin it in place and stitch the side.

6. Match the last two sides, pin and stitch.

7. The 3 pieces assembled should look like.

8. At the bottom edge press the 3 side seams open – you don’t have to press all the way up – just near the bottom.

9. Carefully matching the edges, pin the circle to the bottom opening.

10. Stitch the bottom circle to the opening –  make sure you follow the seam line and use small stitches. It is easier to do this by hand.

11. Use a chopstick to turn the doll right side out through the top opening and run the stick around the seam with firm pressure.

12. Painting the heads – paint simple features with acrylic craft paint or  *get heads that are already painted here.

13. I’m using *crushed walnut shells and a tiny bit of wool to stuff the body (probably not a great idea if you have a tree nut allergy).  Checkout the notes at the top of the post on stuffing materials. You can also use fine sand or sawdust.

14. Place a small funnel in the neck of the body and start adding the filling. As you add the filling use the funnel to crush and press it down and into the edges. Keep compressing and adding filling.

15. Use your chopstick to push filling into any soft areas and add more if necessary.  Tap the bottom of the body on your table to settle the fill and add more – stuffing as firmly as possible will make the best shape.

16. Paint a little glue on the blunt end of your skewer (white or wood glue works).

Read More

wax paper crystal snowflake ornament diy

handmade paper ornaments

handmade paper ornaments

You can make these wax paper snowflake “crystal” ornaments in about 5 minutes with stuff you probably already have. You gotta love that.  And you don’t have to use wax paper. I happen to love it though. I wanted something simple and light for my norfolk pine this year and I’ve always found wax paper magical. These were quick and easy and I had fun making them, I hope you do too. If you do I’d love to see – use #annwoodpattern on instagram.

You will need:

  • wax paper
  • stapler
  • glue stick
  • pinking shears
  • scissors
  • thread for hanging
  • optional – hot glue

make snowflakes from wax paper

1. Cut a strip of wax paper. My strip is the width of the roll and about 5 inches wide.

2. Fold the length of paper into pleats – accordion style. The pleats should be 1/2 inch or a little bigger. You want them to be consistent in size and firmly creased.

paper snowflake ornament diy

3. If you end up with a little extra paper carefully trim it off. Staple the center of your pleated paper – the staple needs to go across the center.

4.  Apply glue stick to the top layer of paper.

5. Fold the pleated paper in half – glue inside. Trim the tip with pinking shears.

6. Cut a couple little notches along the folds.

7. Apply glue stick to one side.

wax paper crystal tutorial

8.  Un- fold into a circle – brining the glued side around to meet the unglued side and press together to attach.

9. Add a string if you like and you’re finished – or…  Add a whole other level of awesomeness…

10. For extra dimension and fancyness make a smaller snowflake. I used a strip of paper about half as long and half as wide. My pleats are about 1/2 inch still but there are less of them.

wax paper craft idea

11. Use a  dot of hot glue to attach the smaller snowflake to center of the larger.

wax paper craft idea

So sweet! I hope you make wax paper snowflakes!

the somewhat weekly newsletter

Do you get my free weekly-ish newsletter? There are tips and tricks, ideas, stuff to try, all the latest news and blogposts and extra stuff, just for subscribers, delivered mostly on Friday. Pretty much.


wax paper craft idea/div>

make a penny rug for the tiny rag doll with wool scraps

make a dollhouse rug from wool scraps

It’s officially cosy season, I kicked it off by boiling some wool scraps on Sunday. I was trying to felt wool without putting it in the dryer. The boiling on its own did not do much in the way of felting but it did produce an unexpected result that I ended up liking, the dyes ran so all my scraps ended up over-dyed.

doll house rug made from wool scraps

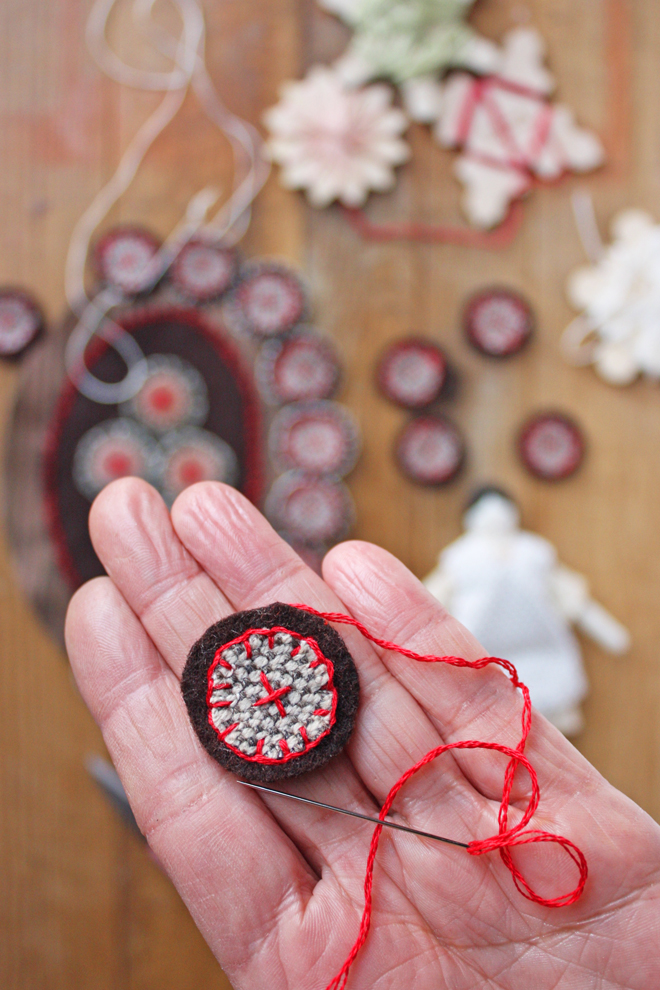
I used some of my boiled wool for this little rug for the tiny rag doll. Of course she needs a cosy rug for her little house in the green valley. I ran into wool pennies and penny rugs for the first time a few months ago. I love a scrap project and the idea of using everything and making something out of nothing. And I’ve got plenty of little scraps of wool. The little stitched circles are charming and satisfying to make. It’s meditative work.

And there are endless ways you could embellish and assemble them. I’ve made you templates for the shapes I used in this little rug.

find the template here

You’ll need wool and/ or wool felt scraps (I used a mix of felt and wool)
Embroidery thread and a needle
And (optional) a glue stick for assembling

1. To make the individual pennies place the little circle in the center of the larger. Stitch an X or star in the center with straight stitches.   Blanket stitch around the edge, to begin make one straight stitch and come back out out at the edge.

2.  Insert the needle a little away from the first stitch and the edge of the circle. Don’t pull the stitch tight.

3. Bring the needle back out just past the edge of the circle, bring your needle through the loop and pull tight.

4. Begin another stitch and repeat all the way around. You will need 20 pennies for this rug.

make a wool penny

To assemble blanket stitch 4 pennies onto oval 1. Attach oval 1 to oval 2. I cut oval 1 with pinking shears and stitched little V’s around the edge to attach it.

make a dollhouse rug from wool scraps

Place your 16 remaining pennies around the edge and blanket stitch around each penny edge attaching them to oval 2.

I hope you make a penny rug! If you do, I’d love to see, you can use #missthistlesociety and #annwoodpattern on instagram. And find more Miss thistle society patterns here.

make a paper boat : a free tutorial

*This post contains an affiliate link

paper boat template image

Some projects are most satisfying to work on in batches. These paper boats are like that. They are quick and easy and you can make a bunch at once without much extra effort. Plus the finished group is very satisfying.  You probably already have most of the materials you need and you could easily be hanging a respectable fleet by the end of the day, who doesn’t want that?

download the boat template


you will also need:

  • heavy paper (I’m using water color paper) or light cardboard (like poster board)
  • a bamboo skewer
  • paper for the sail
  • elmer’s glue
  • gluestick
  • embroidery thread or light string (like baker’s twine)
  • buttons
  • paints, brushes  and/or collage materials
  • exacto knife
  • clothespins or paperclips for clamping

*Please read through all the steps before beginning.

*Also note I included some simple directions on the sail template for your convenience  but the directions below include more details and options.

1.  Cut out the boat and mast support templates and trace them onto light cardboard or a heavy weight paper. I’m Using water color paper (140 pound hot press is my favorite). Optional – paint both sides. I almost always paint a wash of water color on both sides of the boat and mast support.

2. Place the template back on the boat and poke your pencil through where the score lines intersect. Mark with a dot. Remove the template and draw on the score lines. Draw the score lines on the mast support too and mark an X on the center of the top section.

3. Use the back of an x-acto knife to score the lines on the boat and  mast support.

4. Gently fold the boat and mast support at the score lines.

5. Add glue to the last section of the mast support, fold it into a triangle and glue the top section over it.

6. Clamp with paper clip or clothespins while it dries.

make a paper boat

7. While your mast support dries paint or collage or draw on your boat. I did all three. I used a wash of watercolor, some pencil lines and a little collage. If you’re doing lots of collage I recommend using nori paste instead of blue stick . It is awesome. You can find it here. * FYI – this is an affiliate link – meaning I get a small commission if you purchase through the link.

8. Apply glue to the bow as indicated on the template.

9. Fold the boat together at the front and clamp with clothespins or paper clips while the glue dries.  Alternatively – you can skip the glue, bring the front sides together and stitch on the sewing machine close to the edge.

how to make a paper ship

10. Fold the center back ( A on the template) and apply glue to the top.

11. Bend up tab B – covering the top of tab A and matching the top edges. Apply glue and bend up tab C covering the top of tab B and matching the top edges. Clamp and let dry. Alternatively – skip the glue and attach the three layers with a stitch and a button (step 16 below).

easy paper boat project

Read More

easy doll clothes patterns and a free mini straw hat diy

easy doll clothes

A tiny summer top! Who would  have guessed she’d reveal even a hint of midriff. But there it is. Scandalous. You just never know about someone…

easy doll dress, top and hat sewing patterns

A new sewing pattern! And a free tutorial too!

Use your scraps to make adorable dresses and tops for your tiny ladies. She can wear the dress frontwards or backwards for a variety of looks (it would also make a sweet nightgown made from eyelet or a vintage handkerchief).

easy doll clothes sewing patterns

The dress, top and hat are quick and easy to make. I spent a ton of time working out a tiny dress pattern that does not require lots of  hems and has no fasteners. You could use the simple technique to create all sorts of little garments. They are just the right size for the tiny rag doll and the pattern scales well for other rag dolls.

easy doll clothes sewing patterns

easy doll dress sewing pattern

The tiny rag doll needed a summer wardrobe.  She is headed for the French countryside soon so a big sun hat was a must.  The hat is included in the pdf and I’ve shared it below too.

easy doll dress pattern

get the pattern

make a mini straw hat:

free min straw hat diy

A couple material notes – I used cheese cloth – it’s cheap and easy to find. You can also experiment with any very light weight, gauzy, open weave cotton or linen fabric for different effects.

The nail polish bottle is used for forming the hat crown – any similar glass or plastic container can be used. The bottle I’m using made a hat that’s just the right size for the tiny rag doll – it is 5/8th inches across.

I’m using elmer’s glue

Paint – I used acrylic craft paint – mixing shades of brown, ochre and white for a straw shade.

I finished the hat with a mini silk ribbon. I love these ribbons and you can find them here. They are great for lots of tiny details and embroidery too (fyi – the miss thistle society gets a small commission if you purchase through the link).

mini straw hat making suplies

1. Cut a piece of cheesecloth about 5 inches by 5 inches. Cheese cloth has 4 layers and we will use them all.

2. Mix a straw shade of paint and add white glue (about 4 parts glue to 1 part paint). Paint the top 1/4 inch of the cap. Optional – I’m mixing glue into the paint but if you prefer you can just use glue and paint later or leave unpainted.

3. Center the cheesecloth over the cap and pull it tightly over it.

4. Hold the cheesecloth tight with an elastic.  Paint a thin layer of glue or the glue paint mixture on the cheesecloth. Let this dry completely.

5. Remove the rubber band and remove the cheesecloth from the bottle and spread it flat on wax paper.

6. Paint the cheese cloth with a thin coat glue or the glue mixture a little wider than you would like the brim. Brush firmly out from the center. Let this dry completely.

7. When it’s dry lift it off the wax paper.

8. Trim the brim to whatever size you like.

free straw doll hat diy

To finish you can add ribbon or a mini flower or stitch a detail on the brim or crown with embroidery thread. I used 4mm silk ribbon (affiliate link – meaning the miss thistle gets a tiny commission if you purchase through this link).

doll hat diy

I hope you make tiny hats! share your photos with the tiny rag doll community by using  #annwoodpattern and #missthistlesociety on instagram.

mini straw hat diy