
The original plan was to not have handles. It felt impossible and Miss Thistle didn’t seem like a handle kind of doll anyway, what with the no fingers and all. But once I figured out how to make a cup I had to have the handle. The handle quest was long but the solution is easy and makes a truly awesome tiny handle. Really, it is magic.

The little plates are simple too. In my first (and many) attempts I struggled with getting shapes and edges I liked. Lots and lots of failed tiny plates led me to an easy solution for that too.
revelations:
- it’s easier to cut paper clay after it dries a little
- octagons are much easier than circles
- at this very moment your house is full of things that will stamp adorable patterns on tiny plates – soon you will be looking at the bottoms of everything…

Before we talk about how to make the tiny dishes and cups let’s jump ahead to the finishing. Paint your tiny cups and plates and saucers with acrylic paint.
I vote for heart and sweetness over perfection in decorating your miniature china. The more I relaxed the more I liked what was turning up.

*Some links are are affiliate links – meaning I get a tiny commission if you purchase through the link – they are marked with an astirisk *
You can thin the paint to make washes. The effect of painting it on and wiping it off is nice, so is splattering using a toothbrush.
For little details and lines I use this brush*. It’s handy for lots of things.
And optionally finish each with a coat of nail polish. Using one that is not quite clear (mine has just a hint of shell pink) makes a lovely surface.


how to make the teacup
You will need:
- paper clay*
- a sharpie marker (or a few)
- white glue
- embroidery thread (I used – dmc 8 pearl cotton*)
- scissors
- paintbrush
- plastic pencil
- a little cornstarch
- sandpaper
- tooth pick or skewer

Double a length of embroidery thread ( I used dmc 8 pearl cotton – you could experiment with other floss or twine as long as it is a natural fiber). Saturate the doubled thread with glue (I used my fingers) and wind it around the end of the pencil as shown. Let this dry completely

When the thread is dry remove it from the pencil and snip off a small section of one curl. Coat the end of the sharpie with a little bit of cornstarch (just a very light dusting – you don’t need much).

Roll a small and smooth ball of clay in your hands, it should be a little bigger than the end of your sharpie marker. Place it on the end of the marker and begin to press it down.
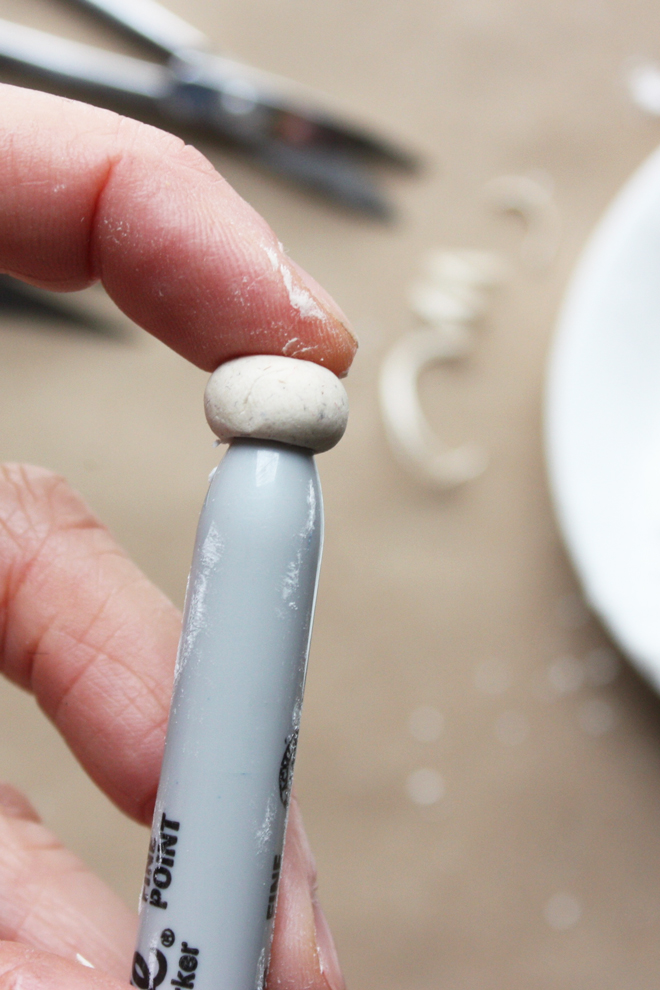
Continue to press the ball over the pen. Gently form it it to the pen with your fingers – you don’t want it too thin.
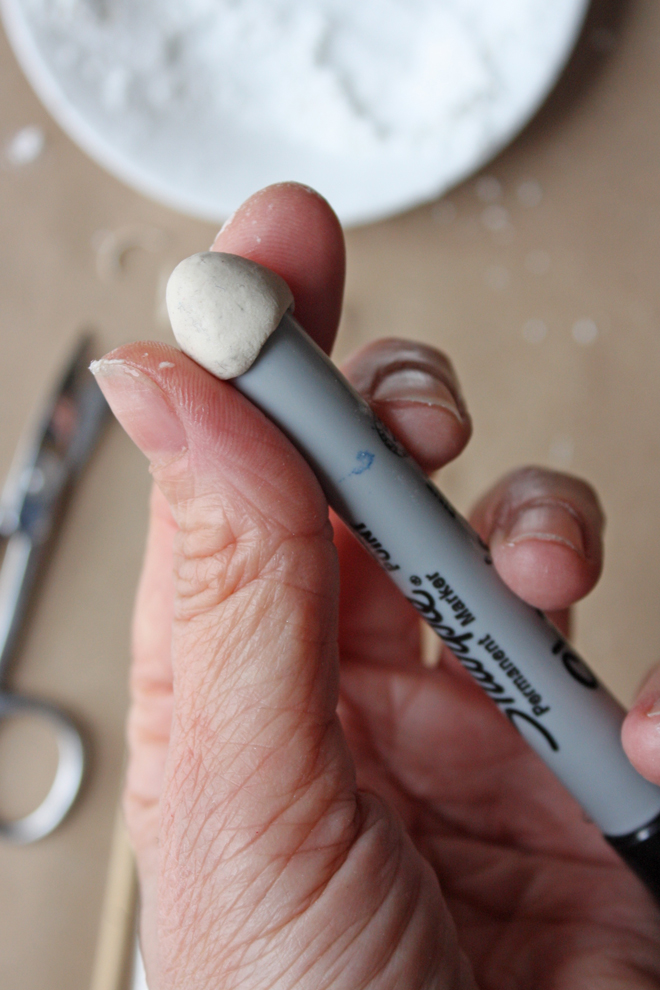

Tap the end of the pen on your working surface to flatten it.

Trim the edge with an exacto knife. It does not need to be perfect (you’ll sand it later). Don’t draw the knife around – press it in, pull the clay away and repeat all around.

Trim your little section of dried thread to the size you want.

Press it into the cup – a little below the top and bottom edges. Use a toothpick to press the clay against the thread. Gently arrange the handle and then leave this undisturbed until dry. Completely undisturbed – step away from the cup…

This is the magic part – apply a little white glue to the handle and spread a little onto the cup where the thread is inserted.

Let this dry. I found one coat of glue was enough but you can add more after the first coat is dry for a more substantial handle.

Sand the teacup with fine sand paper. Tip: glue a piece of sandpaper to a piece of cardboard for making flat surfaces. You could also use an emory board. Sand the top and bottom flat and tear off a little piece of sandpaper to send the entire surface. You are ready for paint! Let’s talk about dishes.
how to make the plates

Begin by gathering things for stamping texture. My favorites were the bottom of a peppermint oil bottle, a mini jam jar and a glue cap. Other ideas are nail polish bottles – the bottoms are great – all sorts of little caps and lids. I had a blast looking around for things. Measuring spoons are ideal for making curves or use anything with a bowl like shape that is very smooth.

You will also need:
- paper clay
- mat board and/or skewers
- scissors
- exacto knife
- rolling pin
- wax paper
- cornstarch
- fine sandpaper
- optional – manicure scissors are handy for cutting little details

Work on a wax paper surface and sprinkle the surface and the rolling pin with a little cornstarch. The key to getting even thickness is to use guides for your rolling pin. Use two strips of mat board (or similar). For a little more thickness use bamboo skewers or chopsticks for even thicker.

Roll out a small piece of clay and stamp with your bottles and caps. I stamped with the peppermint bottle first and then the glue cap here. I made a few more with the mini jam jar and another glue cap. Important: leave a little space between you stamps.

Let the clay dry until it is a little firmer but still flexible – leather like. The timing will vary based on weather, humidity etc. Mine took about two hours.

Separate the plates with scissors and then trim the edges. I found making a good looking octagon much easier than a circle. Trim off each side so it is square and then cut off the corners.

Press the little plate into a measuring spoon – I used the tablespoon.
Flip it out onto a nonstick and non absorbent surface. I used this butcher plate – I love it and use it as a paint palette too.

Let the plates dry. Some of my plates dried perfectly and some lost their shape. Plan on some weird ones and make a bunch. I discarded the really weird ones but here too, I’m more concerned wth heart than perfection. That’s how miss thistle rolls too.
Tip: work in small batches – while some plates are drying stamp out a few more.
Things to experiment with:
- Adding paint to the clay – this worked well – I just kneaded a little acrylic paint in but it was very messy and sticky – fyi.
- different clay thicknesses
- pressing the stamped side of the clay into the measuring spoon

Sand the dried dishes. Sand the top edge and make a flat surface on the bottom. Tear off a little piece of fine sand paper for the rest of the surface.

And then paint your tiny heirloom china! If you make doll house dishes I’d love to see! Use #annwoodhandmade and/or #missthistlesociety on instagram. And if you find something great for stamping please leave it in the comments.
 pin it for later
Do you get my free weekly-ish newsletter? There are tips and tricks, ideas, stuff to try, all the latest news and blogposts and extra stuff, just for subscribers, delivered mostly on Friday. Pretty much.


I absolutely love this idea! You make my heart sing with your innovative and charming ideas. Can’t wait to make my own dishes to share with my granddaughter’s! Thank you so very much♥️
Oh these are so sweet and just what I need for some much needed mindfulness therapy. I now know what I am going to buy from my local hobbycraft store tomorrow, some paper clay my inner child thanks you so much for your easy to follow instructions.
Oh my! These are so wonderfully made. I can see there are a lot of tea parties already being planned by Miss Thistle❣️ Lucky friends.
Love all your work – Miss Thistle, and the colours of the little birds! Thank you. I look forward to trying some soon. You are a true talent, and very generous to share them. Thank you so much.
Amazing!
I’d be happy to follow link so that you can get commission but I’m in uk so use amazon.co.uk is there anyway I can link that to you?
I’ve been waiting for this post with bated breath! Such brilliant ideas – I can’t wait to have a go with this. I love all of your posts – I gave your little birds to all my colleagues for to hang on their Christmas trees the year before last and they all said again this year what a joy it was to unpack them at Christmas time. A real pleasure. Thank you so much.
People who might scoff at our inner child have forgotten. This absolutely makes my heart sing. Thank you for the well written and detailed tutorial. You are right, I am seeing all sorts of tiny possibilities for this craft as well as stenciling with paints and on fabric…
this is so cute, can’t wait to make some of my one.
They are so beautiful and the technique for affixing the handles is genius!
My paper clay package arrived just as I was opening up this blog email. Kismet! Thank you so much for sharing.
I want to know more about Miss Thistle and her world. Where did she get her goats? What do her bee skeps look like? What does her garden look like and what does she grow in it?
Looking forward to learning more.
You. Are. A. Genius. ( Again.)
So very, very clever, I love it! I’m just going to have to give it a go..thank you Ann Wood.
These little dishes and cups are delightful! It was so generous of you to share your amazing creative process. I am going to try these soon. One of the things I thought of was how potters make slab plates and bowls. They place the cut shapes on a piece of foam and with a slightly smaller shaped form, push in the center of the clay shape…it forms a rim and a perfect depression. Not sure if it would work on something this tiny…?
I always enjoy reading your blog and I am always looking forward usually early Saturday mornings (time zone here) to open your email. Thank you for sharing your beautiful creative inspirations.
Oh my. More fun things to make. Your generosity is astounding and heartwarming. Thank you! xo
Thank you so much ! I needed a bowl with a tiny little firedrake painted inside, for a japanese fairytale and I had no idea of how to make it ! just great
Thank you for your kind generosity Ann! This is the most perfect project for me to share with two others who need a little heart hug right now. I’ll send pictures after we do:) xoxo
I just love paper clay but am never sure exactly what to use it for. This is really such a great idea for it! Little figurines having little tea parties, I love it so much!
Fantastic. Thanks.
I have to tell you that I subscribe to many art newsletters and blogs.. I read some . But I read and enjoy each and everyone you send out. I have never not read any or found it less than delightful. You inspire me and I enter a wonderful world with you.. I am beyond delighted to find a kindered soul far away who loves to create.. play with dolls ..old fabrics and an imaginary world. You inspire and delight me. I am always left with the feeling – that I want to create too . You are truly the wind beneath my wings. Much love
You have the patience of a saint!
Oh very well done! I’m so glad to see that you’re getting seduced into dollhouse making. Your little doll pattern is one of my all time favorites.
Love, love this so much. Thank you for sharing.
I am a cookie baker and there is a set that I have called Regency Evendough bands for precise dough thickness. They have bands that go around your rolling pin to keep your dough thickness even. LOL but the set I have starts with 3/8 in. thickness all the way down to 1/16 in. they are very helpful. Also I use food gel coloring in my frosting and I think I might try it in the paper clay to give it color. Gel coloring is much thicker than regular food coloring so it doesn’t thin out the frosting. Just thinking ahead. I so enjoy all that you share Ann.
Thank you for sharing!! So darling. Love ask of your work!
Your cup handle solution is brilliant! I am loving all the Miss Thistle making and her story. Homes are such special places.
This is so clever, Ann!
Thank you for sharing.
Hugs,
Barbara xx
Ann thank you for your tutorial. It’s awesome! I’m super excited to make some dishes for my dollhouse. I’m a brand new miniature dollhouse collector and designer so to speak!
I’ve been looking for tutorials for dishes, bowls and cups that gave the little details. This is perfect! I’m looking forward to exploring your site.
thank you so much. My little dishes came out great. Can’t wait to decorate.I did find that trimming the edges with large nail clippers gets that nice rounded edge for plates. thank you again
Ann: I love your plate tutorial! Well written and illustrated, and reminded me of the 50-60 Fimo plates I made before I managed to turn out 4 that actually matched. I do have one suggestion/correction to the tutorial. You refer to the multi-sided plates as Hexagons, but they are Octagons, since they have eight sides. I didn’t catch this at first reading yesterday, but today I was reviewing the English names of geometric shapes with some Grade 4-5 ESL students and the lightbulb in my head went on.
Mini Hugs. Chris in Canada 🙂
Thanks so much Chris!! I’m so glad you let me know!
Thank you so much for this tutorial, Ann! And may I say how much I love your newsletter for all the wonderful things it leads me to!
Love this they’re so cute .❤
Another way to get the exact size thickness of clay is to use playing cards. Polymer clay artist stack 5-10 cards on either side of the clay and then roll the clay out. You could glue the card stack together once you find your desired thickness. Or glue a set of different thicknesses to have on hand! Cheap fix too!
Love,love your little dishes. I am signing up right away.
Just found this precious site after Jane LaFazio mentioned it on her FB post. I plan to make the paper mâché teacups and also these sweet paper clay dishes. Thanks so much for your detailed instructions.
Thank you so much for this! I love it! I am just getting into miniature doll houses. 1-24 size. I’ve made 2 bedrooms so far and am starting on a 2 story house today. I don’t make them 100% like the instructions. I leave some things out and like to add others. I’m hoping these will work on them. They are so much fun to make.
These are simply adorable and your handle solution is perfect. I need to make some for my Barbie site, it is so hard to find interesting dishware..and this is a perfect solution. Though I may try using polymer clay also. Thanks, loved this!
I’ve just tried making these, and I’ve found if you grind up a bit of chalk pastels you can color the paperclay perfectly!
Sharing this with dad.
Where do you obtain paper clay ?
Hi Patti – There is a link in the materials list in this post. Also if you type paper clay into google search you get tons of results.
Thanks for your kindness.
[…] and painted with acrylic paint. I gave them a glossy topcoat with triple thick glaze. I followed this tutorial by Ann […]
SOOO Sweet! If you want round plates you can go to the polymer clay section and they have very small cookie cutters. So uch to try1 What about making tiny mushrooms and painting the tops.
I wanted to make Christmas type cups and plates. So I had some Christmas stickers that came with my Address labels. I used the small Christmas Trees. I cut out light green circles to put on the plates with the small Christmas Trees. I used Mod Podge on the plate before putting the paper and stickers on it. Then waited for it to dry. Then I put clear sparkling nail polish on the whole plate.
I will be making the cups with a strip of the paper aroun the top and a cut out circle for the saucers.
Thank you for sharing your artistic gifts.