Tag: miss thistle society

new tutorial : miniature farm house plate rack

doll house with tiny dishes in a green wood plate rack on the wall. The house is made from cardboard and has a rustic feel.

A farmhouse plate rack for her perfectly mismatched heirloom china. It’s easy and quick to make and it might be the sweetest thing in the world. A new miss thistle society project is a perfect way to celebrate the 6th anniversary of the sewing pattern.

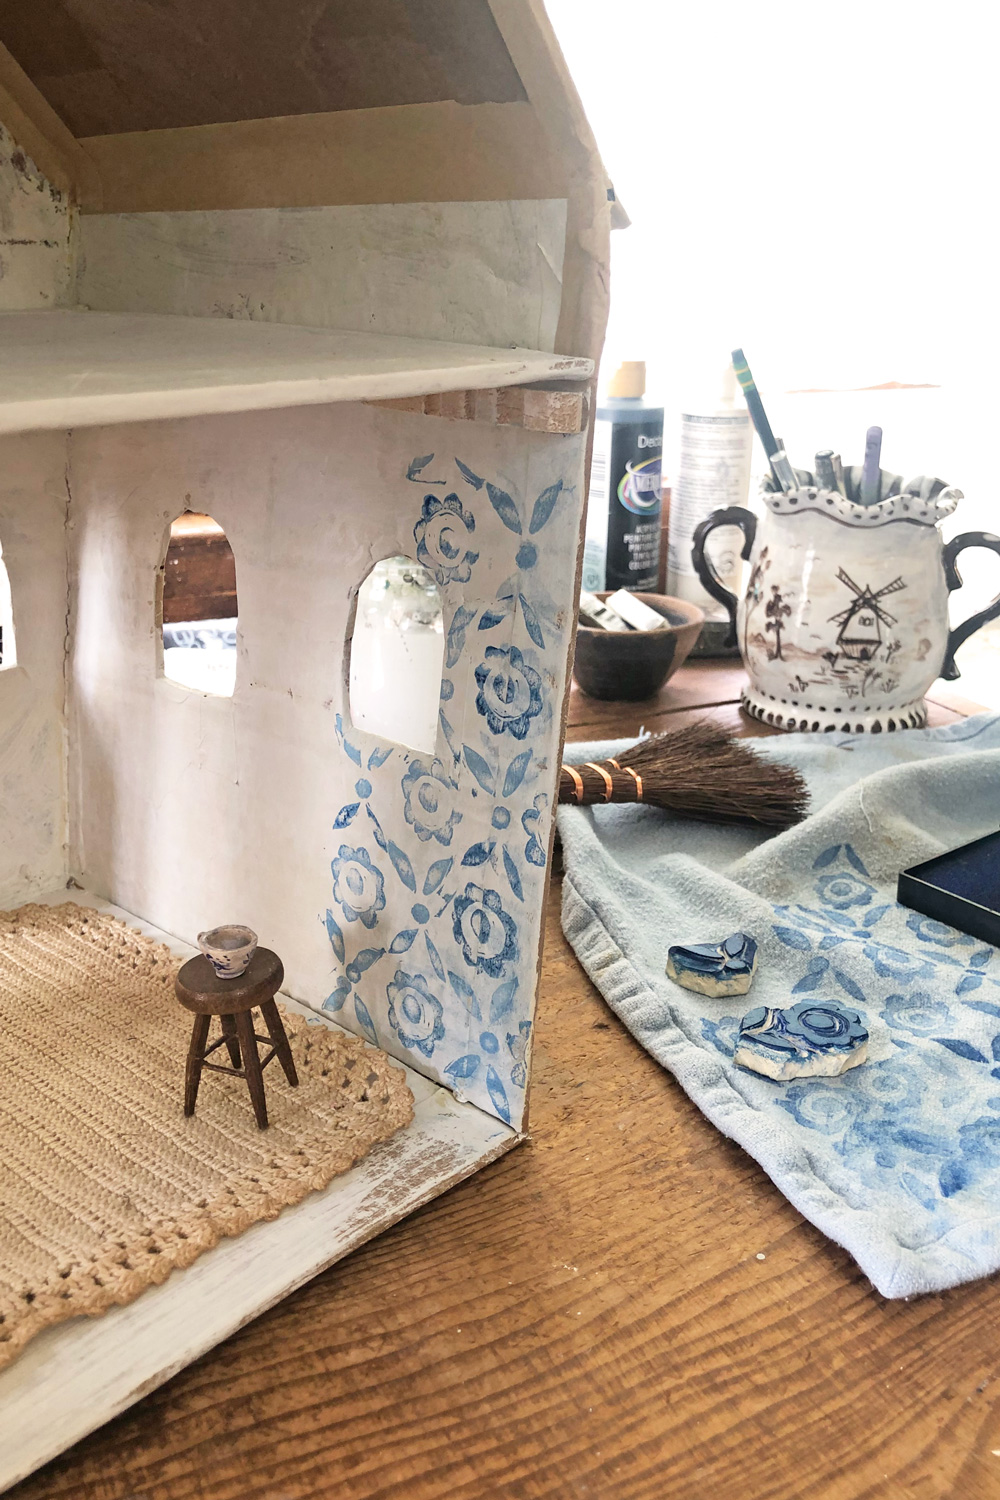
There has been major progress and one big set back in miss thistle’s cardboard house. The blue and white combination for the stamped walls was fine. I just didn’t love it. When I tried to paint over it the stamp pad ink ran and smudged and bled through. Relentlessly.

What finally fixed it was a wash of orangey/brownish paint that neutralized the weird blue and made a perfect variegated background for re-stamping with a more teal blue. The result feels just right. I can feel many generations of thistle women in this little room.

*This post contains affiliate links, meaning I get a small commission if you purchase through the link. Links are highlighted and marked with an asterisk.

Let’s make the plate rack. It’s super easy and you could use the same technique to make all sorts of tiny shelves. And it’s quick, less than an hour except for drying time.

tools and materials

Please read through all the instructions before beginning

  • scissors
  • paintbrushes
  • wax paper
  • popsicle sticks  – *find them here
  • wood coffee stirrer
  • optional – miniature clothespins – so cute – *find them here
  • wood glue
  • fine sand paper
  • light weight cardboard
  • paint

1. You need 9 popsicle sticks, 1 coffee stir stick, a piece of light cardboard and – optional- 1 mini clothespin.  Use scissors (that are not your favorite scissors) to trim the popsicle sticks. Measure carefully and make the cuts as straight as possible. Also use caution- the ends you trim will go flying. Note– if your sticks break your scissors are too dull.

2. Cut 7 sticks to 3 and 3/8th inches and 2 sticks to 2 and 1/4 inch.

3. Cut one piece of cardboard to 3 and 1/2 inches X 2 and 1/4 inches

4. Trim one corner on each of the short pieces to round it. Lightly sand the edges of all the cut pieces.

5. Place wax paper on your work surface and paint wood glue onto the top half inch of the cardboard.

6. Press one of the longer pieces into the glue – centering it on the cardboard along the top edge.

7. Paint another half inch of glue below the first stick and add another – pressing it firmly against the first stick. Repeat with another stick so you have 3 sticks glued down..

8. Apply a strip of glue right under the third stick.

9. Press the edge of the fourth stick into the glue – perpendicular to the other sticks. Hold it for a minute or two to let the glue set a little. This will be your top shelf.

10. Apply a half inch of glue and press the next stick flat below it – pressing it firmly against the edge.

Read More

how to make salt clay

making dolls and mini dishes from salt clay

salt clay diy

It’s also called Victorian Salt Clay, I even love the sound of it. The question was “ What if you want to make tiny dishes but don’t have paper clay?” I wondered if a homemade, air-dry clay could work and the answer is yes. It was a fun experiment plus I love the way it smells – I was immediately 11 again.

Salt is the main ingredient. It produces a clay that is a little more textured than paper clay. It takes a while to dry – a day or two. You shouldn’t bake it but you can put it someplace warm to speed up the process. My oven has a pilot so it’s always a little warm and I put my pieces in it overnight. The small things were dry but the larger pieces needed another day. It’s very hard when dry and can be sanded and painted – I have tips for that below. First let’s make the clay.

You will need:

1 cup of salt
⅓ cup water
½ cup cornstarch
¼ cup cold water

!. Mix 1 cup of table salt with ⅓ cup of water. Heat in a small pan over medium heat, stirring constantly for 4 minutes. Do not let it boil. Remove from heat.

2. Quickly stir the ½ cup cornstarch into ¼ cup cold water. It’s very important that you sprinkle the cornstarch a little at a time stirring constantly or it won’t mix properly.

3. Put the salt mixture back on low heat and add the cornstarch mixture stirring constantly. The mixture will begin to thicken. Keep stirring until it becomes dough like – this happens pretty quickly.

4. Scoop it out onto a plate and let it cool. When it’s cool enough to handle, knead it into a smooth ball. It’s ready to use – you can roll it like cookie dough or sculpt it. Left over clay can be stored in the fridge in an airtight container. I did find it a little crumbly when I took it out of the fridge the next day but after I kneaded it again it was sculpt-able.

making dolls and mini dishes from salt clay

salt clay miniature teacup

I tried making some plates and cups from the tiny dish tutorial and got good results. When I formed it over things it was looser than the paper clay but it still worked. And in the plate tutorial I recommend letting it dry about halfway before cutting the shapes. With the salt clay you can’t do that – it becomes too brittle. It’s a pretty stiff clay though so easy to cut.

dollhouse dish tutorial


Over-all I was pleased with the results – not as fine as the paper clay but still charming and I definitely value heart over perfection in tiny dish making.

Plus it’s fun to make the clay!


I sanded the pieces and painted with watercolor, acrylic craft paint and finished some with nail-polish. Use quick multiple coats of paint. I found if I overworked the paint it would lift.

miniature cast iron pan

The handle on the tiny cast iron frying pan broke when I sanded it but I glued it back on and painted it with black nail polish. The teacup got painted with black nail polish too. The soup kettle was made by forming the clay over a handle – similar to the process for creating the teacup in the dish tutorial.

salt clay diy - pots and pans

salt clay diy

mini doll parts made form salt clay

Parts for a little doll experiment showed up too. Such a funny little lady, I love her. I’ll post a photo when she’s finished.

magic stones made form victorian salt clay

And magic stones.

I made them, that’s how I know for sure they’re magic. They are painted with watercolor and acrylic and finished with a layer of nail polish. The clay and stones would be a fun project to do with little folks and a magic rock in your pocket can’t hurt.

I hope you make victorian salt clay!

the somewhat weekly newsletter

Do you get my free weekly-ish newsletter? There are tips and tricks, ideas, stuff to try, all the latest news and blogposts and extra stuff, just for subscribers, delivered mostly on Friday. Pretty much.


make a penny rug for the tiny rag doll with wool scraps

make a dollhouse rug from wool scraps

It’s officially cosy season, I kicked it off by boiling some wool scraps on Sunday. I was trying to felt wool without putting it in the dryer. The boiling on its own did not do much in the way of felting but it did produce an unexpected result that I ended up liking, the dyes ran so all my scraps ended up over-dyed.

doll house rug made from wool scraps

I used some of my boiled wool for this little rug for the tiny rag doll. Of course she needs a cosy rug for her little house in the green valley. I ran into wool pennies and penny rugs for the first time a few months ago. I love a scrap project and the idea of using everything and making something out of nothing. And I’ve got plenty of little scraps of wool. The little stitched circles are charming and satisfying to make. It’s meditative work.

And there are endless ways you could embellish and assemble them. I’ve made you templates for the shapes I used in this little rug.

find the template here

You’ll need wool and/ or wool felt scraps (I used a mix of felt and wool)
Embroidery thread and a needle
And (optional) a glue stick for assembling

1. To make the individual pennies place the little circle in the center of the larger. Stitch an X or star in the center with straight stitches.   Blanket stitch around the edge, to begin make one straight stitch and come back out out at the edge.

2.  Insert the needle a little away from the first stitch and the edge of the circle. Don’t pull the stitch tight.

3. Bring the needle back out just past the edge of the circle, bring your needle through the loop and pull tight.

4. Begin another stitch and repeat all the way around. You will need 20 pennies for this rug.

make a wool penny

To assemble blanket stitch 4 pennies onto oval 1. Attach oval 1 to oval 2. I cut oval 1 with pinking shears and stitched little V’s around the edge to attach it.

make a dollhouse rug from wool scraps

Place your 16 remaining pennies around the edge and blanket stitch around each penny edge attaching them to oval 2.

I hope you make a penny rug! If you do, I’d love to see, you can use #missthistlesociety and #annwoodpattern on instagram. And find more Miss thistle society patterns here.

easy doll clothes patterns and a free mini straw hat diy

easy doll clothes

A tiny summer top! Who would  have guessed she’d reveal even a hint of midriff. But there it is. Scandalous. You just never know about someone…

easy doll dress, top and hat sewing patterns

A new sewing pattern! And a free tutorial too!

Use your scraps to make adorable dresses and tops for your tiny ladies. She can wear the dress frontwards or backwards for a variety of looks (it would also make a sweet nightgown made from eyelet or a vintage handkerchief).

easy doll clothes sewing patterns

The dress, top and hat are quick and easy to make. I spent a ton of time working out a tiny dress pattern that does not require lots of  hems and has no fasteners. You could use the simple technique to create all sorts of little garments. They are just the right size for the tiny rag doll and the pattern scales well for other rag dolls.

easy doll clothes sewing patterns

easy doll dress sewing pattern

The tiny rag doll needed a summer wardrobe.  She is headed for the French countryside soon so a big sun hat was a must.  The hat is included in the pdf and I’ve shared it below too.

easy doll dress pattern

get the pattern

make a mini straw hat:

free min straw hat diy

A couple material notes – I used cheese cloth – it’s cheap and easy to find. You can also experiment with any very light weight, gauzy, open weave cotton or linen fabric for different effects.

The nail polish bottle is used for forming the hat crown – any similar glass or plastic container can be used. The bottle I’m using made a hat that’s just the right size for the tiny rag doll – it is 5/8th inches across.

I’m using elmer’s glue

Paint – I used acrylic craft paint – mixing shades of brown, ochre and white for a straw shade.

I finished the hat with a mini silk ribbon. I love these ribbons and you can find them here. They are great for lots of tiny details and embroidery too (fyi – the miss thistle society gets a small commission if you purchase through the link).

mini straw hat making suplies

1. Cut a piece of cheesecloth about 5 inches by 5 inches. Cheese cloth has 4 layers and we will use them all.

2. Mix a straw shade of paint and add white glue (about 4 parts glue to 1 part paint). Paint the top 1/4 inch of the cap. Optional – I’m mixing glue into the paint but if you prefer you can just use glue and paint later or leave unpainted.

3. Center the cheesecloth over the cap and pull it tightly over it.

4. Hold the cheesecloth tight with an elastic.  Paint a thin layer of glue or the glue paint mixture on the cheesecloth. Let this dry completely.

5. Remove the rubber band and remove the cheesecloth from the bottle and spread it flat on wax paper.

6. Paint the cheese cloth with a thin coat glue or the glue mixture a little wider than you would like the brim. Brush firmly out from the center. Let this dry completely.

7. When it’s dry lift it off the wax paper.

8. Trim the brim to whatever size you like.

free straw doll hat diy

To finish you can add ribbon or a mini flower or stitch a detail on the brim or crown with embroidery thread. I used 4mm silk ribbon (affiliate link – meaning the miss thistle gets a tiny commission if you purchase through this link).

doll hat diy

I hope you make tiny hats! share your photos with the tiny rag doll community by using  #annwoodpattern and #missthistlesociety on instagram.

mini straw hat diy

make a quick and easy mini quilt from scraps

easy doll quilt tutorial

miniature quilts made from scraps

Make a whole stack of them, they’re just the right size for the clothespin doll bed and super quick and fun to make.

easy doll quilt tutorial

These little quilts are the sort I imagine the Sock’s family has mountains of in their big black house in Woebegone Pines. Haphazard, make-do sorts of things, accidentally charming pieced together leftovers, all thread bare from keeping generations of mischievous Socks offspring cozy.

miniature doll quilts

To make your little quilt print the template and gather cotton scraps. Start freestyle piecing them together.

The template makes a doll quilt that is 6 and 1/2 inches X 7 and 1/2 inches. Exactly the right size for the clothespin bed.

You can stitch by hand or machine (I like to use the machine for this). When you’ve got something bigger than the template pin the patchwork to a backing fabric with the right sides together and cut out. Save the patchwork scraps after cutting – you can stitch those together too. You can add a layer of lightweight cotton flannel inside if you like. I prefer the way the quilt drapes without it.

doll quilt diy

Tip: If you are making a few quilts make one big piece of patchwork and cut them all out. It goes quickly and I think it makes the most interesting compositions.

doll house size quilt tutorial
Stitch the patchwork and backing together. Leave a little opening at one end for turning and clip off the corners.

doll quilt diy


Turn it right side out and use a chopstick to poke out the corners. Press it and whipstitch the opening. You can quilt through it or not. I mostly went with not but did add some sweet red ties to one quilt.

To make the quilt drape nicely over the bed  arrange it and then press it on the bed with a hot iron along the curves and folds.

doll house bed and quiltmr. socks doll in pajamas

It’s all ready for mr. socks. I made him pajamas too (using the free little pants pattern) for an even cozier situation but he refused to wear them. You know how mr. socks is…

mr. socks in a sweet doll bed
the somewhat weekly newsletter

Do you get my free weekly-ish newsletter? There are tips and tricks, ideas, stuff to try, all the latest news and blogposts and extra stuff, just for subscribers, delivered mostly on Friday. Pretty much.


doll quilt from scraps free tutorial

doll house bed tutorial – part 2 : making the mattress

doll mattress sewing tutorial

free doll mattress tutorial

This tufted doll mattress and pillow fit the clothespin dollhouse bed perfectly. It’s quick and easy to make and perfect for the tiny rag doll.

how to make a tufted doll mattress

You will need:

doll mattress sewing tutorial

1

1. Cut out the mattress from cotton fabric, pin with right sides together and stitch as shown.

2.  Pull the fabric sides apart at the corners

3. Open the seam allowance with your fingers and press the seams together. Stitch across at 1/4 inch. Do this for all 4 corners.

doll mattress sewing tutorial

4

4. With all four corners sewn the mattress should look like this.

Read More

how to make a doll house bed from clothespins – part one

doll house bed tutorial

make a doll house wood bed

Do you know somebody very little who needs a bed? A tiny rag doll perhaps? I’ve made you a tutorial for a sweet wooden dollhouse size bed made from clothespins and craft sticks. It is perhaps my greatest gift to humanity. Also, I had an unbelievably good time figuring it out and making it. So obsessed…

It is the latest Miss Thistle Society project, the quest to fully outfit the tiny rag doll’s world. Of course she needs a super cozy bed. The epic instructions for the bed are below and find the instructions for an easy tufted doll mattress here.

I hope you make sweet little beds! Tag your posts on instragram with #annwoodpattern and #missthistlesociety.

how to make a doll house bed from clothespins

note : It is very helpful to read through the directions completely before beginning.

doll bed from clothespins materials

*This post contains affiliate links – if you purchase supplies through some of these links The Miss Thistle Society gets a small commission.

Materials:

  • 6 clip clothespins and a few extra for clamping – I’m using these.
  • 11 jumbo craft sticks – The sticks are 6 inches by 3/4 inch – available in most craft stores or you can find them here.
  • small bamboo skewers – 1 or 2 depending on the length – I’m using these.
  • paint

Tools

  • wood glue
  • wax paper
  • scissors
  • wire cutter
  • ruler
  • exacto knife
  • paintbrushes
  • OPTIONAL – spackle, sandpaper

doll house bed diy - parts

Cut:

  • 8 – 3 and 3/4 inch craft sticks
  • 2 – 4 and 3/4 inch craft sticks
  • 2 – 4 and 1/2 inch bamboo skewers
  • 6 – split clip clothespins
  • And 1 whole craft stick

Separate the clothes pins by twisting. I used old but sturdy scissors to cut the craft sticks and wire cutters to snip the skewers.

cut parts for doll bed tutorial

Accurate measuring is very important to all of this fitting together.  And cut your craft sticks as straight as you can.

1. Make a mark on one side of 4 clothespin halves 1/8th inch from the notch on the flatside.

2. Apply wood glue to the end of one of the 3 and 3/4 inch craft stick pieces.

doll bed how to step 3

3

3. Working with wax paper underneath press the craft stick against the clothespin -as shown-  at the mark. The stick should be at a right angle to the clothespin.

doll bed diy

4

4. Repeat the previous step so you have two glued sets. Let these dry undisturbed on the wax paper until thoroughly set.

doll bed diy

5

5. Make 2 more sets and add a second stick to each. Add the second stick next to the first – closer to the tapered end of the clothespin. Let these dry as well. You should now have 4 glued sets of sticks and clothespin halves.

dollhouse bed tutorial

6.

6. You can use a ruler to check that your sticks are at a right angle to the clothespin.

7. When the glue is dry gently peel your pieces from the wax paper. Begin with the single stick pieces. They will be fragile so handle them gently. You will also need 2 more clothespin halves and one of your 4 and 1/2 inch skewers.

8. Flip one clothespin and stick set over so the flat side of the clothespin with the notch is facing you. Apply glue to one end of a the skewer.

Read More

miniature dish tutorial : make tiny teacups and plates

doll house dish tutorial

doll house dishes diy

The original plan was to not have handles. It felt impossible and Miss Thistle didn’t seem like a handle kind of doll anyway, what with the no fingers and all.  But once I figured out how to make a cup I had to have the handle. The handle quest was long but the solution is easy and makes a truly awesome tiny handle. Really, it is magic.

doll dishes diy

The little plates are simple too. In my first (and many) attempts I struggled with getting shapes and edges I liked. Lots and lots of failed tiny plates led me to an easy solution for that too.

revelations:

  • it’s easier to cut paper clay after it dries a little
  • octagons are much easier than circles
  • at this very moment your house is full of things that will stamp adorable patterns on tiny plates – soon you will be looking at the bottoms of everything…

miniature china tutorial

Before we talk about how to make the tiny dishes and cups let’s jump ahead to the finishing.  Paint your tiny cups and plates and saucers with acrylic paint. 

I vote for heart and sweetness over perfection in decorating your miniature china. The more I relaxed the more I liked what was turning up.


doll house dishes diy

*Some links are are affiliate links – meaning I get a tiny commission if you purchase through the link – they are marked with an astirisk *

You can thin the paint to make washes. The effect of painting it on and wiping it off is nice, so is splattering using a toothbrush.

For little details and lines I use this brush*.  It’s handy for lots of things.

And  optionally finish each with a coat of nail polish. Using one that is not quite clear  (mine has just a hint of shell pink) makes a  lovely surface.

doll house dishes diy

doll house ideas

doll house dishes diy

doll dish diy

how to make the teacup

You will need:

  • paper clay*
  • a sharpie marker (or a few)
  • white glue
  • embroidery thread (I used – dmc 8 pearl cotton*)
  • scissors
  • paintbrush
  • plastic pencil
  • a little cornstarch
  • sandpaper
  • tooth pick or skewer

tiny teacup diy

Double a length of embroidery thread  ( I used dmc 8 pearl cotton – you could experiment with other floss or twine as long as it is a natural fiber).  Saturate the doubled thread with glue (I used my fingers) and wind it around the end of the pencil as shown. Let this dry completely

miniature teacup diy

When the thread is dry remove it from the pencil and snip off a small section of one curl. Coat the end of the sharpie with a little bit of cornstarch (just a very light dusting – you don’t need much).

Read More

make a miniature stone hearth : the miss thistle society

making a miniature fire[lace form egg cartons

Penelope T. Littles

She has been speaking to me for a long time. Little whispers of her origins, her tidy house, her hearty ancestors.  This is what I know about Miss Thistle.

I’m sure she cooks on an open hearth and has a cozy spot by a window for sewing and correspondence and daydreams and tea.

Thistle P. Littles, Green Valley. Morning, Mountain Shadow

She tends a medium size garden and keeps chickens and goats and bees. And she has sweet miss-matched china – passed from aunts and grandmothers and friends.

My way into Miss Thistle’s world is the hearth. Your tiny rag doll might need a hearth too.

miniature stone hearth tutorial

It’s not hard to make. And before we dive into how I want to tell you about the next Miss Thistle Society project: her mismatched china. I have a trick that makes it pretty easy and spectacularly fun to make her tiny hand-me-down plates and cups. Look for that next week.

doll house plates

paper clayYou probably have most of the things you need for her dishes, except maybe the clay. I use paper clay – this is my brand and you can get it here  (The Miss Thistle Society gets a tiny commission if you purchase through this link).  I use it for lots of things but I always buy the small size because it does not store well after opening.

To make the hearth you will need:

  • paper egg cartons
  • light cardboard
  • elmer’s glue
  • mat board (or a thick cardboard (not corrugated)
  • exacto knife and scissors
  • masking tape
  • spackle (  Find it at any hardware store – I like Fast ‘n Final Lightweight Spackling)
  • craft paint
  • brushes – a variety of sizes
  • toothbrush
  • a sponge and a soft rag
  • fine sand paper

And you will need a hearth. A shape to work on.  I made my shape out of foam core and mat board. It’s assembled with hot glue mostly. So many burns…  And I made a giant hearth – you don’t need to. A small one is sweet and quick to make.

This tutorial is concerned with making the stone finish but I will offer a couple tips on making your foundation shape.

make the hearth opening

The easiest thing to do is start with a box (a sturdy corrugated box).  The box above is about 6 X 9 inches and 1 and 3/4 inch deep.  Mark the opening and use your exacto knife to cut all the way through the lines marked in red and score (just cut the surface of the cardboard) the lines marked white.  Fold back the sides to make the inside walls of the hearth.  Glue the hearth walls in place and cover the scored areas and edges with making tape.

If you make your own shaped foam core is great  – choose white or black.

Whether you build the shape or use a box, re-enforce  the corners (inside) with little triangles of mat board glued in. A few in each corner will make everything stable and sturdy.

I’m demonstrating the stone texture on my huge hearth. Cut shapes from grey cardboard and tear shapes from a grey paper egg carton (the flat parts) to create a little variety in texture and edges. Glue them to your structure with elmer’s glue.  I made my structure out of black so you could see but it does not matter – white grey or brown is fine.

cardboadr stone hearth

Cover the entire structure (I left a small section of my hearth un-stoned because I have a wood mantle I want to add). Let the stones dry in place.  Read More

little doll jacket : a free sewing tutorial

tiny rag doll jacket

Sometimes a light jacket is just the thing and I’ve made you a simple and easy sewing pattern in two sizes, one for the tiny rag doll (or any dollhouse size doll) and a slightly larger version for mr. socks. And the pattern scales well so you could use it for other dolls too. It’s quick and very easy.

little doll jacket sewing pattern

tiny rag doll jacket

The hat pattern is free too and you can find the satchel pattern here, if you need to fully outfit someone tiny.

mr. socks jacket : free pattern

You might also notice that mr. socks is wearing pants for the first time. I made them using the bloomer pattern for the tiny rag doll sewing pattern. I add about 1/4 inch to the pattern and left an opening in the back to accommodate his tail.

mr. socks

mr. socks in pants
little doll jacket : free tutorial

little doll jacket : free tutorial

To make the jacket you will need : wool felt, an embroidery thread, a tiny button, basic sewing supplies and the pattern.

download the sewing pattern here

* You can click each image for a larger view

1. Cut out the three pattern pieces and pin to your felt.
2. Cut out one of each.

3. Fold the rounded collar of the front top over and stitch.  I’m using one strand of embroidery floss. You can use any stitch you like, fancy or simple. I’m using a basic whip stitch.
4. Fold over each rounded cuff and stitch as well.

5. Pin the front under piece to the back piece, make sure your folded and stitched cuffs  are on the outside.
6. Pin the front top piece as shown.

Read More

a coat for tiny rag doll and a free tiny hat tutorial

tiny traveler

winter rag doll

Of course she needs a sensible coat!  And it’s reversible! I’m pretty excited about the reversibleness of the coat – and the nifty way it goes together – it feels like kind of a magic trick ( I included a video link for that part). I also love that the coat is built from just two pieces and demonstrates an awesome system for making reversible doll garments – you could modify the pattern and use the same easy technique to create all sorts of lined or reversible little clothes.

I also made a little lined flat bottomed satchel for her foraging and a hat  too. Tiny rag doll is ready for adventure.

Find sample pages from the pattern here and here.

tiny doll : winter wardrobe

shop_button_coat

tiny rag doll winter wardrobe

The winter wardrobe pattern is in the shop now

free tiny hat pattern

And I’m including the little hat pattern in this post too – download the template here and instructions are below – it’s very simple, easy and quick – you can make one in under twenty minutes.

For the tiny hat you will need a little wool, felt or flannel and contrasting embroidery thread. Pin the hat pattern to the fabric and cut out.

Whip stitch all around the bottom edge with a strand or two of embroidery thread.

ann wood tiny doll hat 3

Fold the hat in half and whip stitch the back seam from the bottom towards the tip.

tiny doll hat

Knot just before the tip and fray the tip. And finally tie little lengths of embroidery thread to the ear flaps and knot.

tiny_doll_hat

tiny traveler

She is fully outfitted for her travels. A couple other notes on the pattern- the coat and satchel will fit mr. socks too and you could scale it for other dolls. I have not tried the hat on mr. socks – but I think it would work if you enlarge it a little.

Find more tiny rag doll accessory DIY projects here!


tiny doll : winter wardrobe
ann wood handmade : tiny hat

the somewhat weekly newsletter

Do you get my free weekly-ish newsletter? There are tips and tricks, ideas, stuff to try, all the latest news and blogposts and extra stuff, just for subscribers, delivered mostly on Friday. Pretty much.