
You think it’s easy being a tiny doll? You need all sorts of equipment. Ideas for a mini wheelbarrow have been rolling around forever.
What made it difficult is committing to no drilling and the question of the wheel. I wanted this tutorial to use stuff you mostly already have around or that’s easily gettable at the grocery store. No specialty items or power tools…

I tried buttons, wire, string and all sorts of attachments and nothing worked. Hours and hours of failure. The answer came to me in a flash while walking to the post office and not thinking about tiny wheelbarrows at all. A gift from my subconscious (I love it when that happens):
ditalini
Pasta wheel hubs.

It worked perfectly. And it also led me to a not pasta alternative in case you don’t have any ditalini or are spiritually opposed to using a macaroni product in your work.
The answer for the wheel is cardboard. Laminating cardboard together makes a perfect antiquey, hand-tooled feeling wheel.


I guarantee there is someone in your life who needs a tiny cardboard wheelbarrow, they just don’t know it yet.
*This post contains affiliate links, meaning I get a small commission if you purchase through the link. Links are highlighted and marked with an asterisk.
download the template here
tools and materials
**Please read through all the instructions before beginning**
- the pdf template
- wood coffee stirrers (mine are 5.5 by about 1/4 inch and have rounded ends)
- wood toothpicks
- plain light weight cardboard (no printing on it- not glossy)
- black or brown paper (or the secret ingredient)
- xacto knife
- clothespins – for clamping
- bamboo skewer (thinner kind)
- large embroidery needle
- glue (I’m using *clear tacky craft glue)
- gluestick (any glue stick is fine but I’m loving *this rice paste stick)
- fine sand paper (or emery board)
- craft paints and brushes
- colored pencils
- black markers- fine and basic sharpy

1. Cut out the templates (cut the dotted black lines) and trace onto the chipboard. Trace one wheelbarrow, 4 wheels and 2 inner wheels. Mark the score lines (the gray lines on the templates) on the wheelbarrow. Score the lines with the back of your xacto knife. Poke a hole in the wheel template and mark the center of each wheel piece.
-

- 2

-

- 3

2. Cut out your pieces.
3. Use your large embroidery needle to poke a hole in each wheel and then use the skewer to enlarge the holes.
-

- 4

-

- 5

4. Apply glue to one of the wheels – you want good coverage around the edge especially. Glue all the wheels together. Press firmly and laminate them together.
5. Push the skewer through to make sure the hole is clear and lined up. Remove the skewer and let the wheel dry.
-

- 6
-

- 7

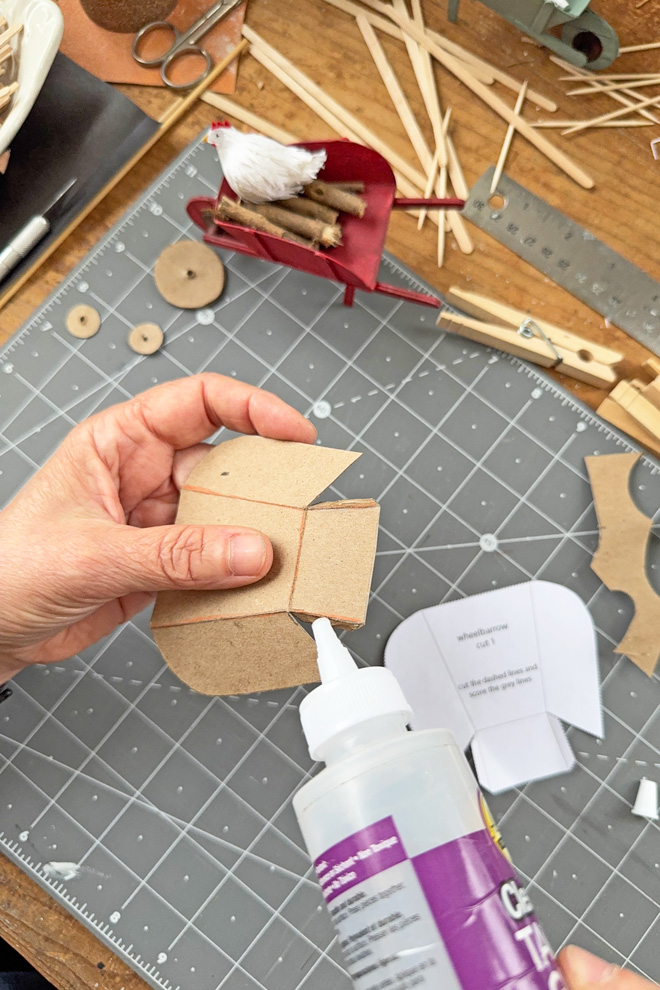
6. Bend the back, sides and tabs at the score lines. Fold the tabs in and apply glue to the tabs.
7. Glue the tabs to the inside of the sides and clamp with clothespins.
-

- 8

-

- 9

8. Cut 4 stirrers to 4.5 inches. Save the remaining ends for later.
9. Place the leg template on a stirrer and cut 2. We want the angled end to be accurate.
-

- 10

-

- 11

10. Optional – clip off one of the corners on the end of the stirrers to create a handle. ProTip- old manicure scissors are great for this sort of thing.
11. Apply glue to one stirrer and glue it to another. Repeat for the other two stirrers. Clamp them with clothespins while they dry.

Support free patterns and tutorials and keep the awesome free projects flowing!
Click here to add your support.

Let the glue dry thoroughly before continuing.
-

- 12

-

- 13

12. While our parts dry lets talk about the wheel hubs- Ditalini works great. Perfect. There’s a lot of ditalini in a box – pick out two that make a good pair. If you have no ditalini you can make a paper hub.
13. If not using ditalini – Cut 2 strips of paper (not cardstock) – black or brown is great but you can use plain and paint it later. The strip should be about 7 inches long and 3/16 ths wide. Apply gluestick to all but about 2 inches.
-

- 14

-

- 15

14. Starting with the end without glue wrap the paper tightly around the end of your skewer.
15. Continue to wrap tightly – add a little more glue to tack down the end. Remove form the skewer. Repeat with the other strip. Let them dry.
-

- 16

-

- 17

16. I’ll be using ditalini. Glue them to the rounded end of your doubled sticks with a big drop of glue. Let them dry.
17. Trim your wheel for a rustic hand tooled wood look. You can also sand the edge a little with your fine sand paper (or emery board).
-

- 18

-

- 19

18. Paint the sides and inside of the wheelbarrow. Do not paint the bottom yet. Put your wheel on a skewer and paint. The secret to painting cardboard is to not add water and use a light touch. I’m using basic craft paint. I’ve chosen a dark and dull color and I’ll highlight it with something brighter later.
19. Paint the ditalini and wheel covers (front and edges) dark brown.
-

- 20

-

- 21

20. Add orange and brown colored pencil to the wheel covers for a rusty look.
21. Optional – draw a couple lines with a fine marker to look like boards. Highlight with a brighter shade of colored pencil for a weathered wood look.
-

- 22

-

- 23

22. Thread the wheel covers and wheel onto a toothpick. Glue the wheel covers to the wheel. Trim the toothpick to 3/4 inch with the wheel centered. Color the toothpick ends with a sharpie.
23. Optional – use a colored pencil to a weathered wood highlights to the wheelbarrow.


24. Measure 1/8 inch in from each side on the small end of the wheelbarrow and 1/4 inch in on the wider side. Connect those marks with a line. Place the sticks with the cut handle side facing up and the ditalini (wheel hubs) facing in. Make a mark 1 inch in from the ditalini end.
25. Add a line of glue just inside the left line.

26. Line the mark on the stick up with the edge and press the stick into the glue. Let this dry completely before proceeding – it’s a walk away moment…
-

- 27

-

- 28

27. When the first side is thoroughly dry add a line of glue just inside the other line.
28. Put one side of the wheel shaft into the ditalini (or rolled paper) hub.
-

- 29

-

- 30

29. Place the second ditalini hub over the wheel shaft, line up your stick mark with the edge.
30. Press the stick into the glue. Let this dry completely.
-

- 31

-

- 32

31. While the glue dries paint the front and sides of the 4 – 1 inch pieces.
32. When the glue is completely dry make 2 marks on the bottom 3/8th of an inch from the edge.
-

- 33

-

- 34

33. Glue the legs in against the sticks. The angled end meets the wheelbarrow. Notice that the legs slant towards the wheel.
34. After all the glue is dry finish painting and add color pencil highlights.


So much depends
on a red wheel barrow
Glazed
with rain water
Beside
the white chickens.
William Carlis Williams
Thank you. Your work is inspirational. Jeanette
Wow Jeanette – thank you. What a poem – it’s a reason for living.
Love the wheel barrow.
Wish you would set your directions up so we can pin them to Pinterest. My Dropbox for saving is full
Fantastic!!!
I cannot even wait to make this Ann!
Thank you so much for your inspiration and how-to.
I will send a photo when I complete this!
thanks again
Thank you for the joy you bring to my life with all your wonderful creativity X
Will definitely be making one of these very useful wheelbarrows! Just what my little doll Ada needs for her gardening. I guess I need to make a little hen as well! Thanks for the inspiration and directions, Ann! Jan in MA
So … so … beautiful. thank you. can’t wait to make this.
Ditalini…that made me laugh! And that “Murder of Crows” by David Johnson is fantastic…thank you for sharing!
What a tiny treasure the wheelbarrow is! I don’t think I’m spiritually opposed to using noodles in my art? Hysterical. The pickle people remind me that I drew pickle people in my sketch book a couple of years ago to amuse myself but have yet to try to stitch them up. Tackling the UFO pile now so will try to stay on course….
I am so impressed. How you figured out the mechanics of this project, engineered it, and yet the art, the creation of it.
Can’t wait to try this. The chickens look very noble in their Chariots.
I love this! I’m now rootling through my pantry to look for other uses for pasta shapes. Rotelle already looks like a wheel and, as I’m not spiritually opposed to using pasta, I might sneak one of those out of the box to use instead of cardboard.
Thanks so much for this very helpful tutorial Ann. The result is perfectly adorable!
Lovely!
In my house (stocked with too much plastic kiddy craft nonsense) we’d probably use perler-style beads instead of the ditalini; I suspect those with a varied bead cabinet might have non-plastic tube beads in a useful size also.
(Pasta doesn’t last quite as well in the humidity here.)
Olivia my Blythe doll who has a florist shop and is now helping me in the patio “garden “ needs this wheelbarrow to move the petals , she hijacks back to her shop
I’ve got some ancient glass beads that belonged to my aunt (born 1924) when she was little. Very ordinary toy stuff. But now it’s an extra antique detail!
Just finished making a couple of the little wheelbarrows. So much fun! Glad MY Miss Thistle has a new accessory to help around the garden. I gave a presentation to my doll club a couple of months ago about “Falling Down the Ann Wood Handmade Rabbit Hole.” They loved it and enjoyed seeing my ship and little boats; little owls; tiny crepe paper chickens; my very unfinished Miss Thistle house; my stuffed chickens (used as a garland for over my kitchen sink); chickens appliqued on quilts, dish towels, and potholders; and my little rag doll and Mr. Socks. Members were frantically searching on their phones for your website and I hope they continue to follow you and buy patterns.